// 01 · INTRODUCTION
1. Introduction
1.1. What is Inputize
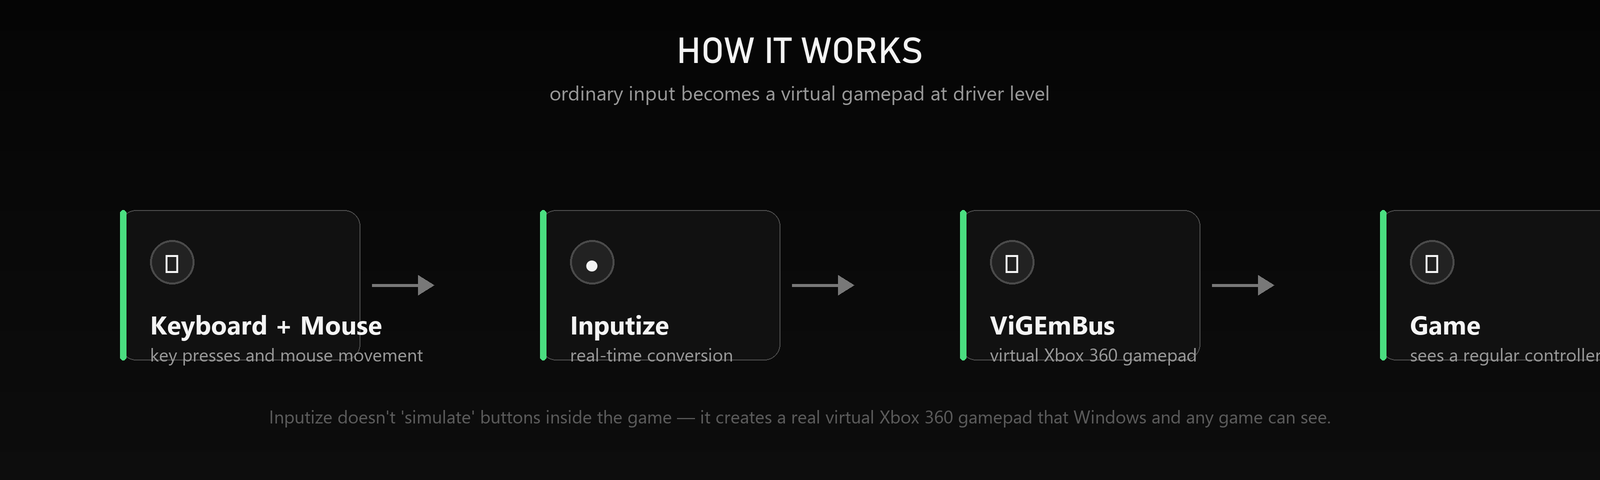
Inputize is a gamepad emulator for Windows. The program reads keyboard presses and mouse movement and turns them into the signals of a real virtual Xbox 360 gamepad created at driver level on the ViGEmBus bus. To the game, the anti-cheat and Windows itself this is an ordinary connected controller — the program does not “push buttons” inside the game and does not touch its memory.
You play with a keyboard and mouse while the game thinks a gamepad is connected: Xbox button prompts appear, the built-in aim assist works, and the control scheme adapts to a controller.
1.2. Key features
- Button mapping — every gamepad button can be bound to any key or mouse button, with Normal / Hold / Toggle / Turbo / Double / Combo / Trigger modes.
- Mouse → right stick — mouse movement is converted into an analog stick in real time: sensitivity, response curves, smoothing, boost.
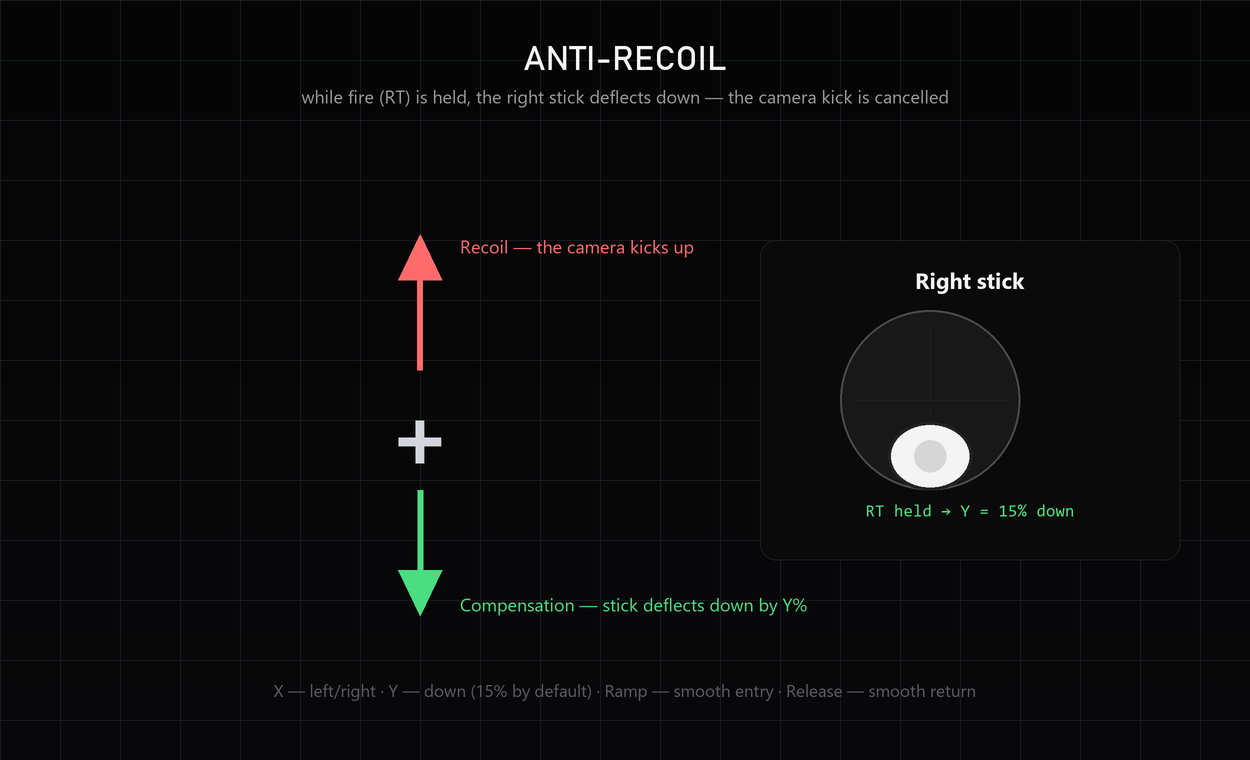
- Anti-Recoil — while fire (RT) is held, the right stick smoothly deflects down and cancels the camera kick.
- Aim-Assist Engine — stick-signal shaping that makes the game apply its built-in aim assist more strongly (Warzone and similar shooters).
- Orbital Aim Assist (ADS) — with RMB held and the mouse still, the stick traces a slow circle so the game never “drops” the aim assist.
- Profiles — unlimited sets of settings, switching with F9/F10, sharing via Copy/Paste Code, auto-applied by the running game.
- Overlay & tray — a transparent window over the game and control from the system tray without opening the main window.
- Global hotkeys — F11, F9, F10, F12 work even while the game is in focus.
1.3. System requirements
| Component | Requirement |
|---|---|
| OS | Windows 10 or Windows 11, 64-bit |
| Driver | ViGEmBus (installed automatically on the first launch, one click) |
| File | a single executable Inputize-Emulator.exe (~31 MB); Python is not needed |
| Mouse / keyboard | any HID-compatible devices |
| Internet | only for license activation and update checks |
// 02 · INSTALLATION & ACTIVATION
2. Installation & Activation
2.1. Installing the program
- Download
Inputize-Emulator.exefrom the link you received after purchase (Google Drive / email / Telegram). - Run it with a double click. Windows SmartScreen may warn about an unknown publisher — click More info → Run anyway. This is normal: the file is unsigned, while the ViGEmBus driver itself is Microsoft-signed.
- On the first launch the program offers to install the ViGEmBus driver — press the install button and confirm the UAC prompt.
- If Windows asks for a reboot after the driver install — restart the computer and run the program again.
- A desktop shortcut is created automatically (it can be disabled in Settings).
2.2. License activation
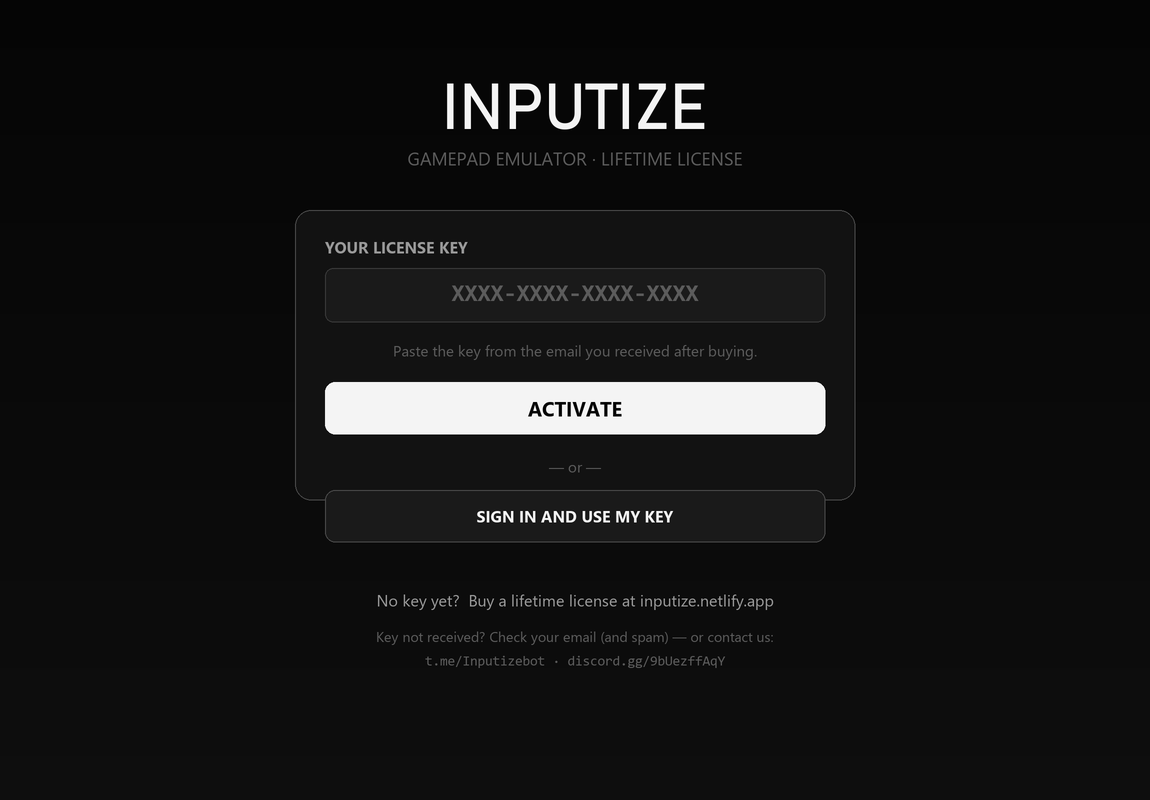
Inputize is a paid program with a lifetime license. On the first launch an activation window opens with two ways to unlock it:
- Paste a key — enter the key from the email you received after paying (or the key bound to your account at inputize.netlify.app) and press ACTIVATE.
- Sign in and use my key (SIGN IN AND USE MY KEY) — enter your Inputize account email and password; the program shows the keys bound to the account and you pick one. The password is never saved.
After a successful activation the key is cached in %APPDATA%\Inputize\license_emulator.json, and the program works offline — no internet required afterwards. Emulator and filter (RC Filter) keys are not interchangeable: each product has its own key.
2.3. First-run wizard
On the first launch a three-step setup wizard opens: welcome → ViGEmBus driver check → done. The wizard checks whether the driver is installed, downloads and installs it with one click if needed, then creates the default FPS profile and shows a hint: press F11 to activate.
// 03 · INTERFACE OVERVIEW
3. Interface Overview
3.1. Window header
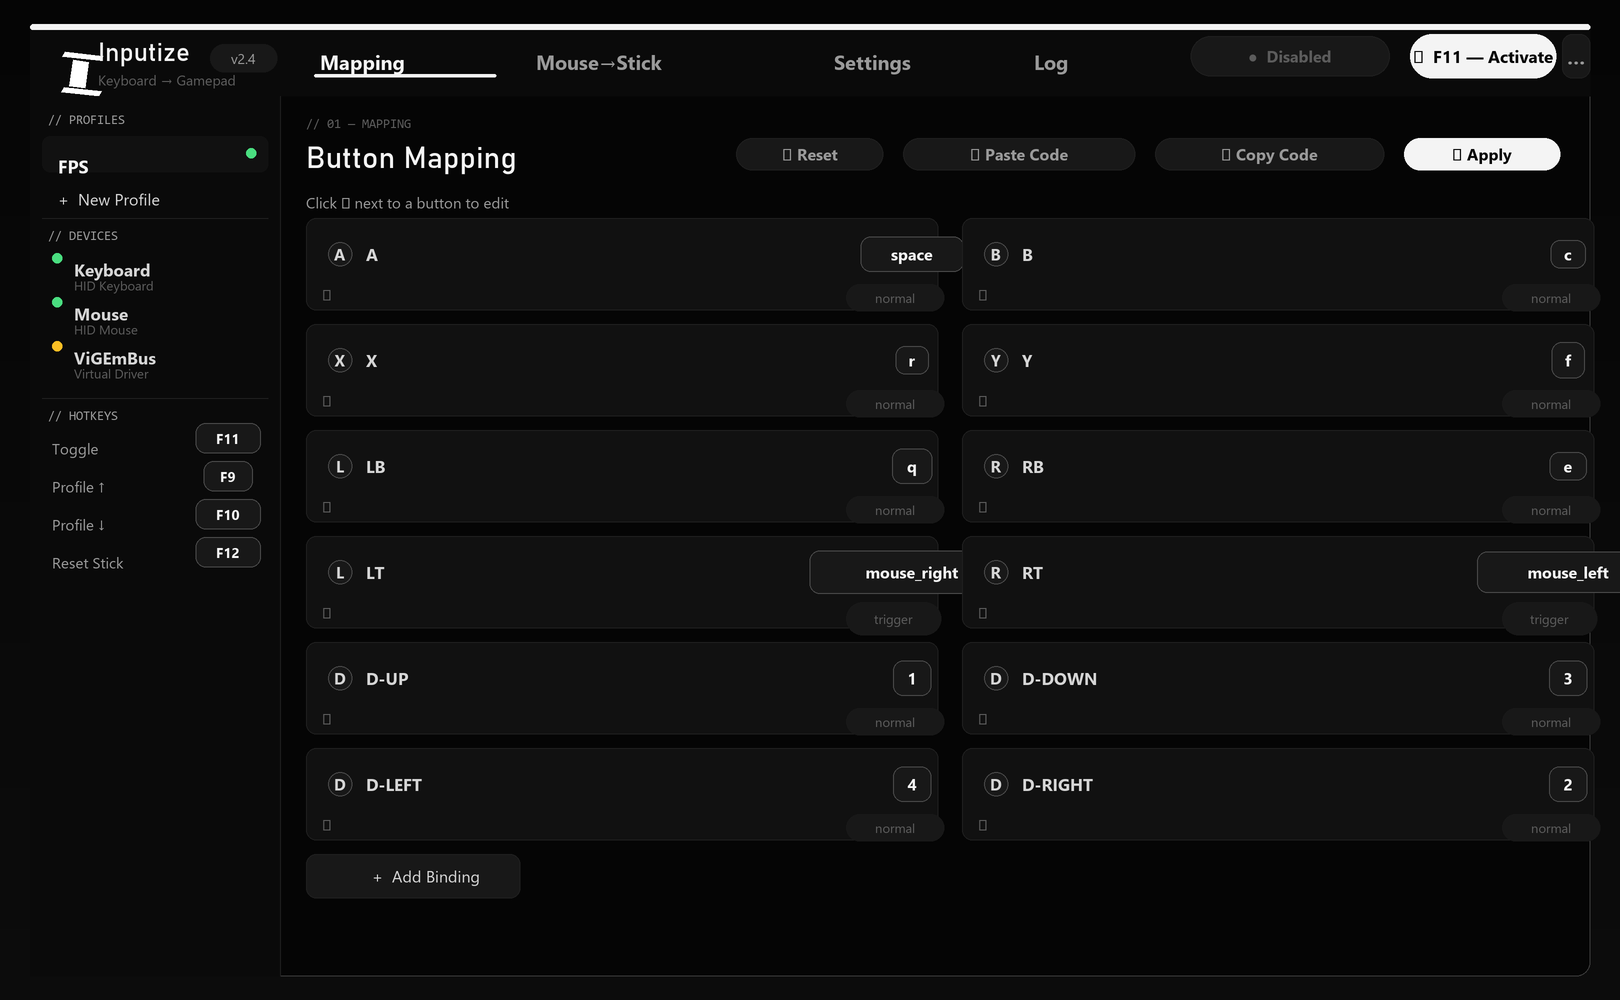
- Logo and version — on the left; the version sits in a small badge.
- Tabs — Mapping, Mouse→Stick, Settings, Log (the active one is underlined).
- Status — the ● Disabled / Active indicator and the ▶ F11 — Activate button that turns emulation on.
- Buttons Overlay (show/hide the overlay above the game) and Settings (global program settings).
3.2. Sidebar
- // PROFILES — the list of profiles (“FPS” by default); the active one is highlighted with a green dot; + New Profile creates a new one.
- // DEVICES — device status: Keyboard, Mouse (green dot — connected) and ViGEmBus (yellow — the virtual driver).
- // HOTKEYS — assigned global keys: Toggle F11, Profile ↑ F9, Profile ↓ F10, Reset Stick F12.
3.3. Mapping tab
A grid of cards: for every gamepad button (A, B, X, Y, LB, RB, LT, RT, D-pad, sticks) the assigned key and mode are shown. The ✏ button opens the bind editor. At the top: ↺ Reset (back to defaults), ⧉ Copy Code / ⧉ Paste Code (share the whole layout as a text string) and ✓ Apply (apply and save).
3.4. Mouse→Stick tab
All mouse-to-stick conversion settings: sensitivity, response curves, smoothing, conversion algorithm. See section 7 for details.
3.5. Settings (Advanced) tab
Advanced profile settings: stick deadzones, aim assist, anti-recoil, triggers, stick poll rate and game auto-detection. See section 8 for details.
3.6. Log tab
The event log with ⏸ Pause, Save (to .txt) and ↺ Clear buttons. Below — the latency oscilloscope and statistics: ViGEmBus state, virtual gamepad number, version and CPU load.
// 04 · QUICK START
4. Quick Start
- Run
Inputize-Emulator.exeand activate the license (if not activated yet). - Wait for the first-run wizard to check / install the ViGEmBus driver.
- Make sure the FPS profile (the default) is selected in the profile list.
- Launch the game and open its control settings — select the Gamepad / Xbox 360 mode if the game allows it.
- Press F11 (or the ▶ F11 — Activate button) — the indicator turns Active, and the overlay (if enabled) shows a green dot.
- Play: WASD — movement, mouse — look, Space — jump, LMB — fire, RMB — aim.
- Press F11 again to stop emulation.
// 05 · HOTKEYS
5. Hotkeys
| Key | Action | Note |
|---|---|---|
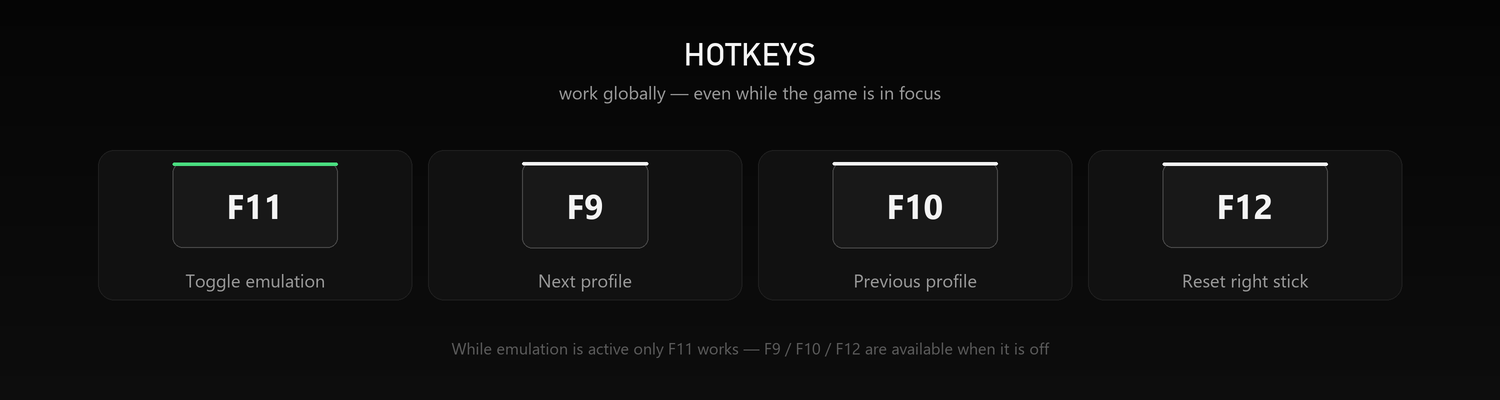
| F11 | Enable / disable emulation | always works, even in-game |
| F9 | Next profile | only while emulation is off |
| F10 | Previous profile | only while emulation is off |
| F12 | Reset the right stick to center | only while emulation is off |
All four keys can be reassigned in Settings → Hotkeys (section 11.4). If one key is assigned to two functions, the program warns about the conflict — only the first assignment works.
// 06 · BUTTON MAPPING
6. Button Mapping
6.1. Default layout (FPS profile)
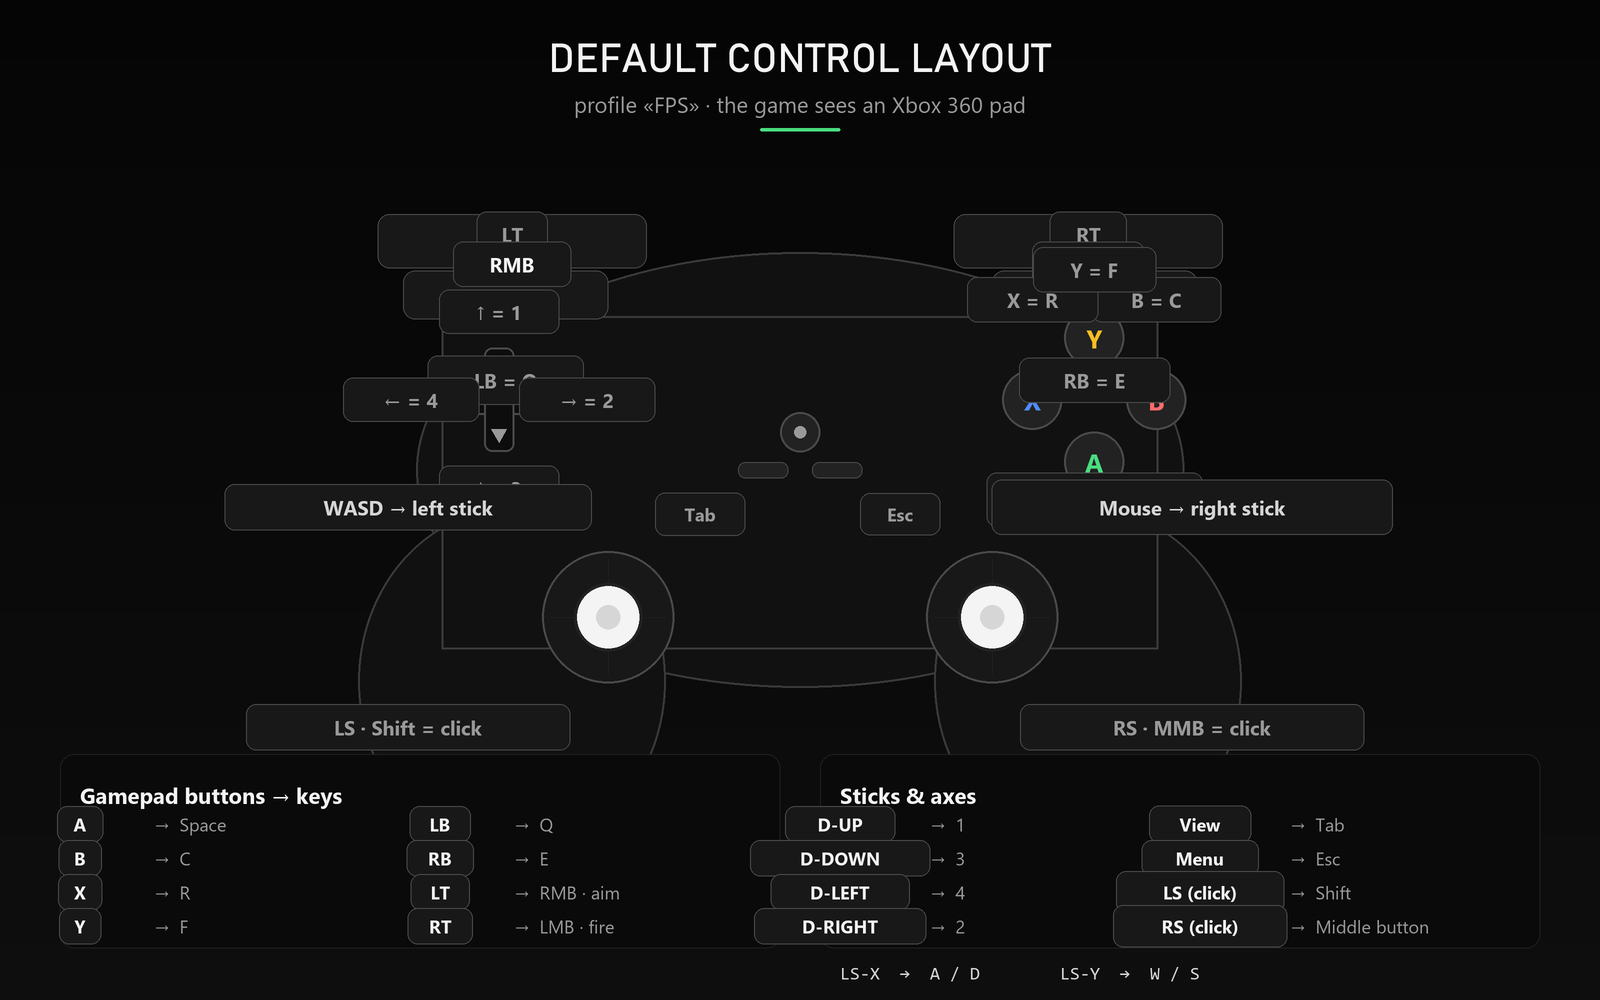
The layout is designed for first-person shooters: movement — WASD, look — mouse, crouch — C, reload — R, interact — F, aim — RMB, fire — LMB, weapon slots — keys 1–4.
6.2. Full default mapping table
| Gamepad button | Key | Gamepad button | Key |
|---|---|---|---|
| A (jump) | space | D-UP | 1 |
| B (crouch) | c | D-DOWN | 3 |
| X (reload) | r | D-LEFT | 4 |
| Y (interact) | f | D-RIGHT | 2 |
| LB | q | View / Back | tab |
| RB | e | Menu / Start | escape |
| LT (aim) | mouse_right | LS (click) | shift |
| RT (fire) | mouse_left | RS (click) | mouse_middle |
| LS-X (left stick) | a / d | RS-X (right stick) | mouse_x |
| LS-Y (left stick) | w / s | RS-Y (right stick) | mouse_y |
6.3. Bind editor
Click ✏ next to a gamepad button — the Binding window opens. Click the capture field and press the key (or mouse button — for example mouse_left, mouse_right, mouse_middle, the wheel). For stick axes the two directions are bound separately.
Available modes:
| Mode | Behavior |
|---|---|
normal | The gamepad button is held while the key is held (standard). |
hold | Hold — the button stays pressed for as long as the key is held. |
toggle | Latch: one press holds the button, the next press releases it. |
turbo | Auto-repeat of presses while the key is held. Rate — 1–60 presses/s (Turbo rate). |
double | Double tap: two quick button ticks on a double key press (within ~300 ms). |
combo | Key combination such as ctrl+c or shift+r — fires when all parts are held. |
trigger | Analog trigger: pressed — full value, released — zero. |
axis | Stick axis: two keys for opposite directions (e.g. a/d). |
You can also tick the modifiers Ctrl, Shift, Alt, Win, or write a combination like ctrl+... straight into the key field for axes.
6.4. Reset and apply
- ↺ Reset — restore the current profile layout to defaults (with confirmation).
- ✓ Apply — apply the changes and save the profile.
- ⧉ Copy Code / Paste Code — copy the whole profile config as a text string or paste someone else's (great for sharing layouts with other players).
// 07 · MOUSE → RIGHT STICK
7. Mouse → Right Stick
This is the heart of the emulator: mouse movement is converted into an analog right stick in real time. All settings live on the Mouse→Stick tab and apply instantly — many of them without a restart.
7.1. Sensitivity
| Setting | Range | Default | Purpose |
|---|---|---|---|
| Hip Fire | 0–100 | 65 | Base aim sensitivity (not aiming) |
| ADS (hold RMB) | 0–100 | 40 | Sensitivity while RMB is held — lower for more precise aiming |
| X (horizontal) | 0.10–3.00 | 1.00 | Horizontal axis multiplier |
| Y (vertical) | 0.10–3.00 | 0.90 | Vertical axis multiplier (slightly reduced by default) |
7.2. Response curves
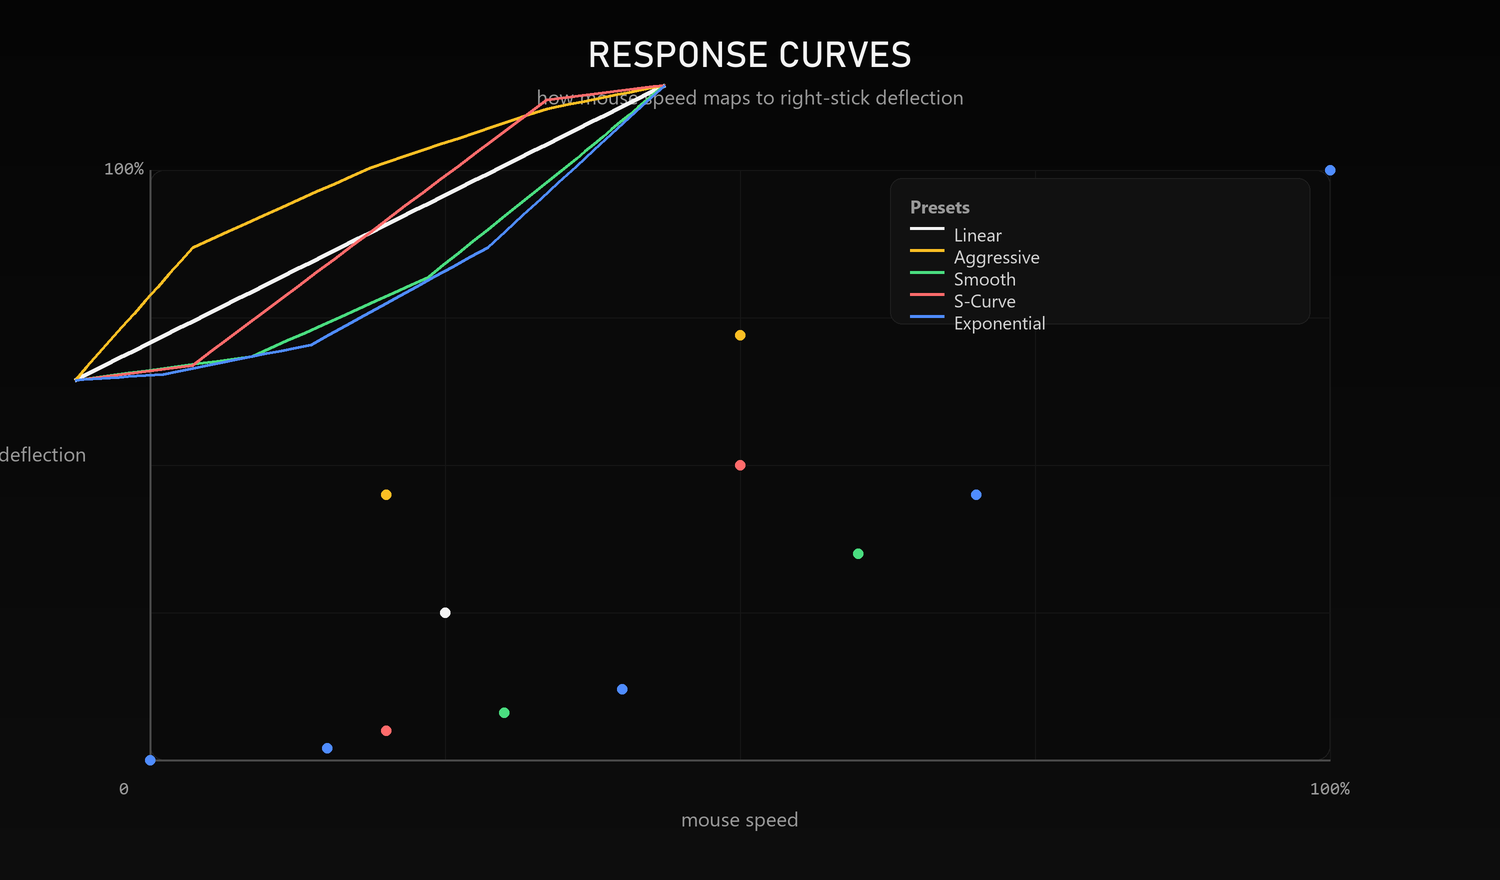
A curve defines how mouse speed maps to stick deflection. Every preset has an intensity slider (0 — linear, 100 — full effect); “Linear” is the plain 1:1 diagonal.
| Preset | Behavior |
|---|---|
Linear | Direct 1:1 mapping — predictable and precise. |
Aggressive | Reaches large deflection quickly — sharp turns. |
Smooth | Smooth start, precise fine-tuning at low speeds. |
S-Curve | S-shaped: precise middle, confident edges. |
Exponential | Soft center, aggressive flicks. |
7.3. Smoothing
Smoothing averages frames of mouse movement — the aim becomes steadier and hand micro-jitter disappears. Ready-made presets (one click) or manual tuning (Custom mode):
| Preset | Description |
|---|---|
Competitive | Minimal smoothing, maximum flick responsiveness. |
Precision | Maximum precision at low speeds (fine aim). |
Balanced | A balance of smoothness and response — universal start (default). |
Smooth | Strong smoothing, removes micro-jitter. |
Synchro | Classic stable EMA. |
Smoothing mode: Standard (Dynamic) — adaptive, stronger at low speeds and weaker on flicks; Classic (Static) — fixed EMA filter. The Adaptive checkbox enables speed adaptation for the standard mode. Mouse deadzone (px/s) — movements slower than the threshold are ignored (5 px/s by default): it kills hand “rest” jitter and sensor drift.
7.4. Conversion Algorithm
| Toggle | What it does |
|---|---|
| Mouse Smoothing | Averages several frames of movement (on by default). |
| Boost Mode | Acceleration on fast mouse movement — faster flicks. |
| Auto-Return Center | The stick returns to center when the mouse stops. |
| Circular Response | Circular response: diagonals don't over-deflect into corners. |
Stick return parameters: Return delay (0–100 ms, default 50) — the pause before the return; Return speed (20–250 ms, default 60) — how fast the stick settles back to center (lower is snappier).
// 08 · ADVANCED SETTINGS
8. Advanced Settings
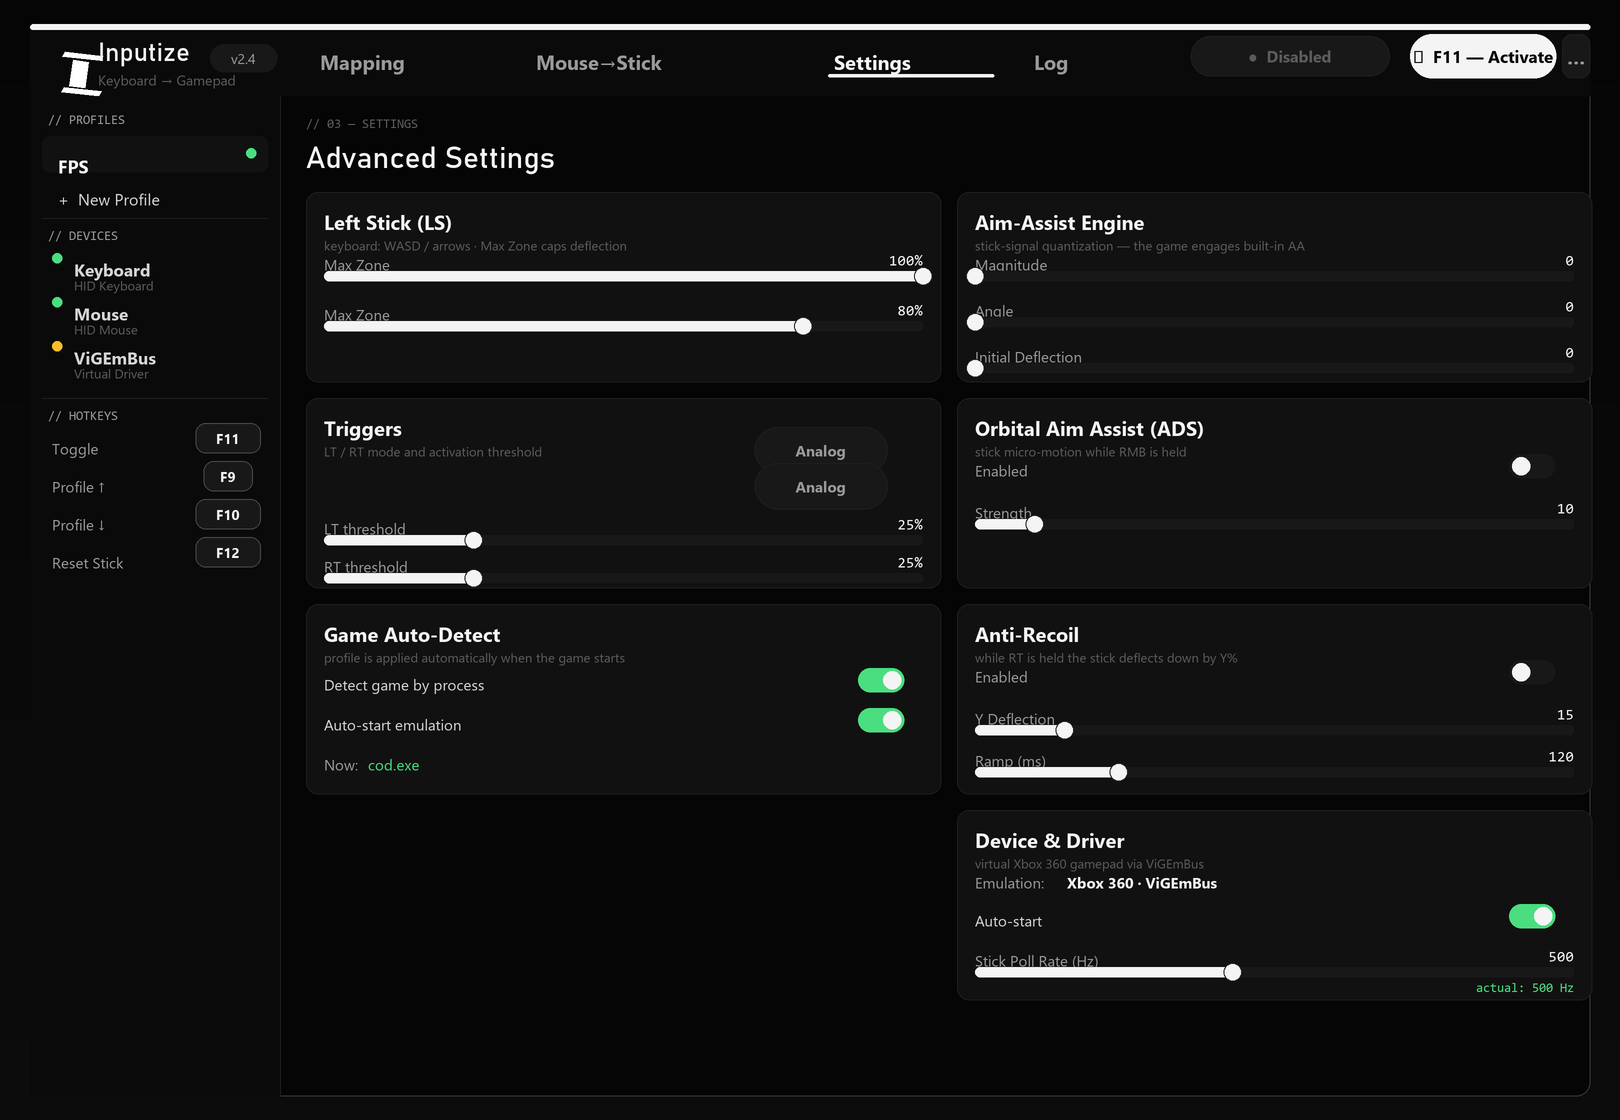
8.1. Sticks: deadzones and caps
| Setting | Range | Default | Purpose |
|---|---|---|---|
| LS · Max Zone | 60–100 % | 100 % | Left stick deflection cap (keyboard) |
| RS · Deadzone | 0–40 % | 8 % | Right stick deadzone — removes drift near the center |
| RS · Max Zone | 60–100 % | 100 % | Right stick deflection cap |
| RS · Deadzone type | Per-axis / Circular | Per-axis | Deadzone shape: square or round |
The left stick is driven by the keyboard (digital input — full press), so it has no deadzone, only the Max Zone deflection cap.
8.2. Aim-Assist Engine
Signal shaping that makes the game treat the stick as a real analog controller and apply its built-in aim assist more strongly:
| Setting | Purpose |
|---|---|
| Magnitude (0–100) | Quantizes deflection magnitude into discrete steps. |
| Angle (0–100) | Quantizes the stick angle. |
| Magnitude Speed (0–100) | Quantization that grows with mouse speed: slow corrections stay smooth, flicks become coarse steps. |
| Initial Deflection (0–100) | Minimum deflection level while moving — for games with a wide stick deadzone. |
| Turn Speed Cap (0–100) | Drops excess speed at full deflection — the stick doesn't over-rotate after a flick. |
8.3. Orbital Aim Assist (ADS)
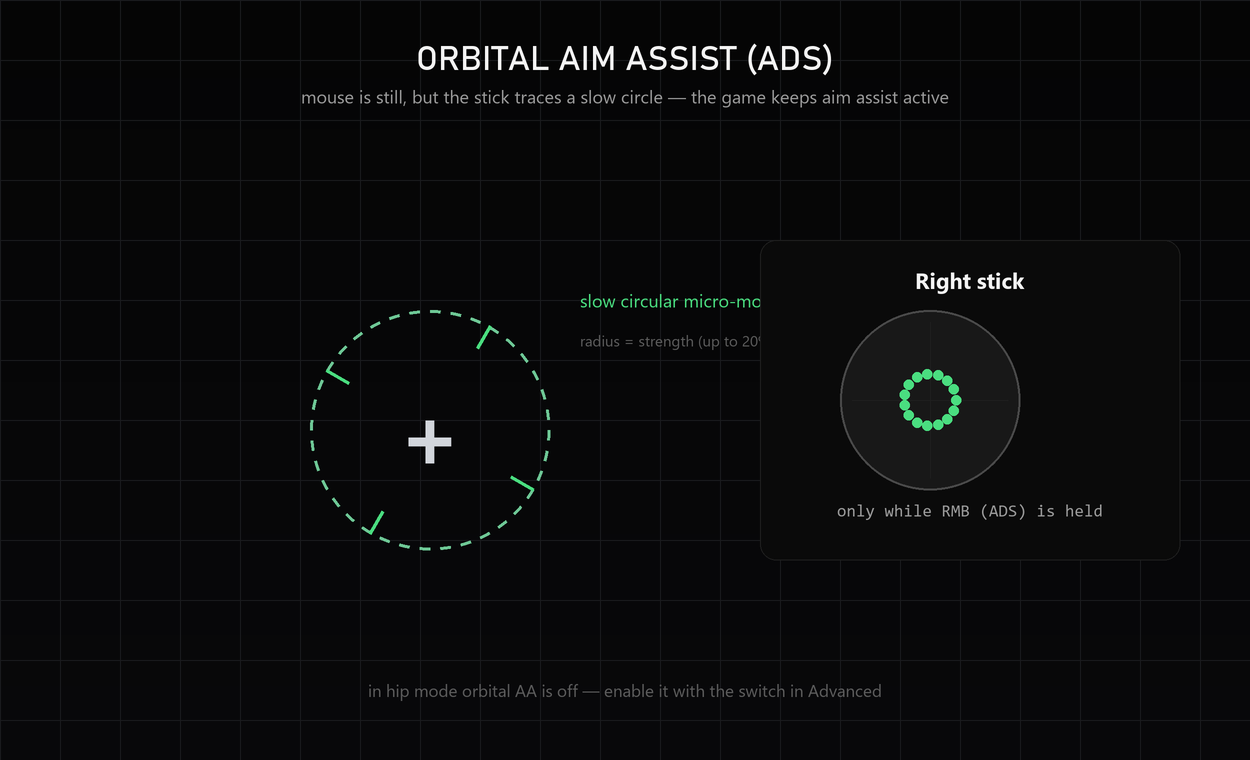
While RMB (aim) is held and the mouse is still, the right stick traces a slow circular micro-motion — the game never sees a dead stick and keeps its built-in aim assist active. Strength is the circle radius (up to 20 % of stick travel). It works only in ADS; in normal mode it is off so it never interferes with precise holding.
8.4. Anti-Recoil
While fire (RT) is held, the right stick is additionally deflected by the set X/Y — the camera kick is cancelled with a stick push down. X > 0 — right, Y > 0 — down (the recoil-compensation standard).
| Setting | Range | Default | Purpose |
|---|---|---|---|
| Enabled | on/off | off | Turns recoil compensation on |
| X Deflection | −100…+100 % | 0 | Horizontal component |
| Y Deflection | −100…+100 % | 15 | Vertical component (down) |
| Ramp | 0–500 ms | 120 | Smooth entry — no yank the moment you start firing |
| Release | 0–500 ms | 120 | Smooth return after releasing fire |
| Delay | 0–500 ms | 0 | Pause before compensation starts |
8.5. Triggers (LT / RT)
- Analog — the trigger passes its real travel (for
LT-ANALOG/RT-ANALOGbindings). - Digital — the trigger instantly snaps to 100 % once the threshold is crossed.
- Threshold — 0–100 %, 25 % by default; applies to analog trigger bindings, keyboard bindings are always digital.
8.6. Device & Driver
- Emulation is fixed as Xbox 360 · ViGEmBus — this is exactly the controller the game sees.
- Auto-start — launch the program with Windows (HKCU registry entry, no admin rights needed).
- Stick Poll Rate (Hz) — 125–1000 Hz, 500 by default. How often the stick state is reported to the game. A live actual: … Hz indicator sits next to it (green ≥90 %, yellow ≥60 %, red — the engine can't keep up).
8.7. Game auto-detection
When a game whose process name is listed in the profile starts, the program automatically switches to that profile and (per the setting) starts emulation; when the game closes it stops and restores the previous profile. Process names are set in the profile file profiles/00_*.json in the process_names field, e.g. cod.exe, r5apex.exe.
// 09 · PROFILES
9. Profiles
A profile is a complete set of settings: button layout, mouse parameters, curves, smoothing, anti-recoil, deadzones, triggers, poll rate and the list of game processes. You can make a separate profile for every game.
9.1. Creating and switching
- Click + New Profile in the sidebar and enter a name (e.g. “Warzone”).
- Set up the layout and mouse parameters on the Mapping and Mouse→Stick tabs.
- Switching: click a profile name in the list or use F9 / F10 (while emulation is off).
- The active profile is marked with a green dot; all changes are saved automatically.
9.2. Sharing profiles (Copy / Paste Code)
⧉ Copy Code on the Mapping tab copies the whole profile config as one text string — you can send it to a friend. ⧉ Paste Code applies a pasted config. This is the main way to share layouts; it fully replaces file export/import.
9.3. Auto-applying by game
Turn on Game Auto-Detect (Settings → Advanced → Game Auto-Detect): processes from the profile's process_names pick up the right layout and start emulation automatically. The current game is shown in the “Now: …” line.
// 10 · OVERLAY & SYSTEM TRAY
10. Overlay & System Tray
10.1. Overlay above the game
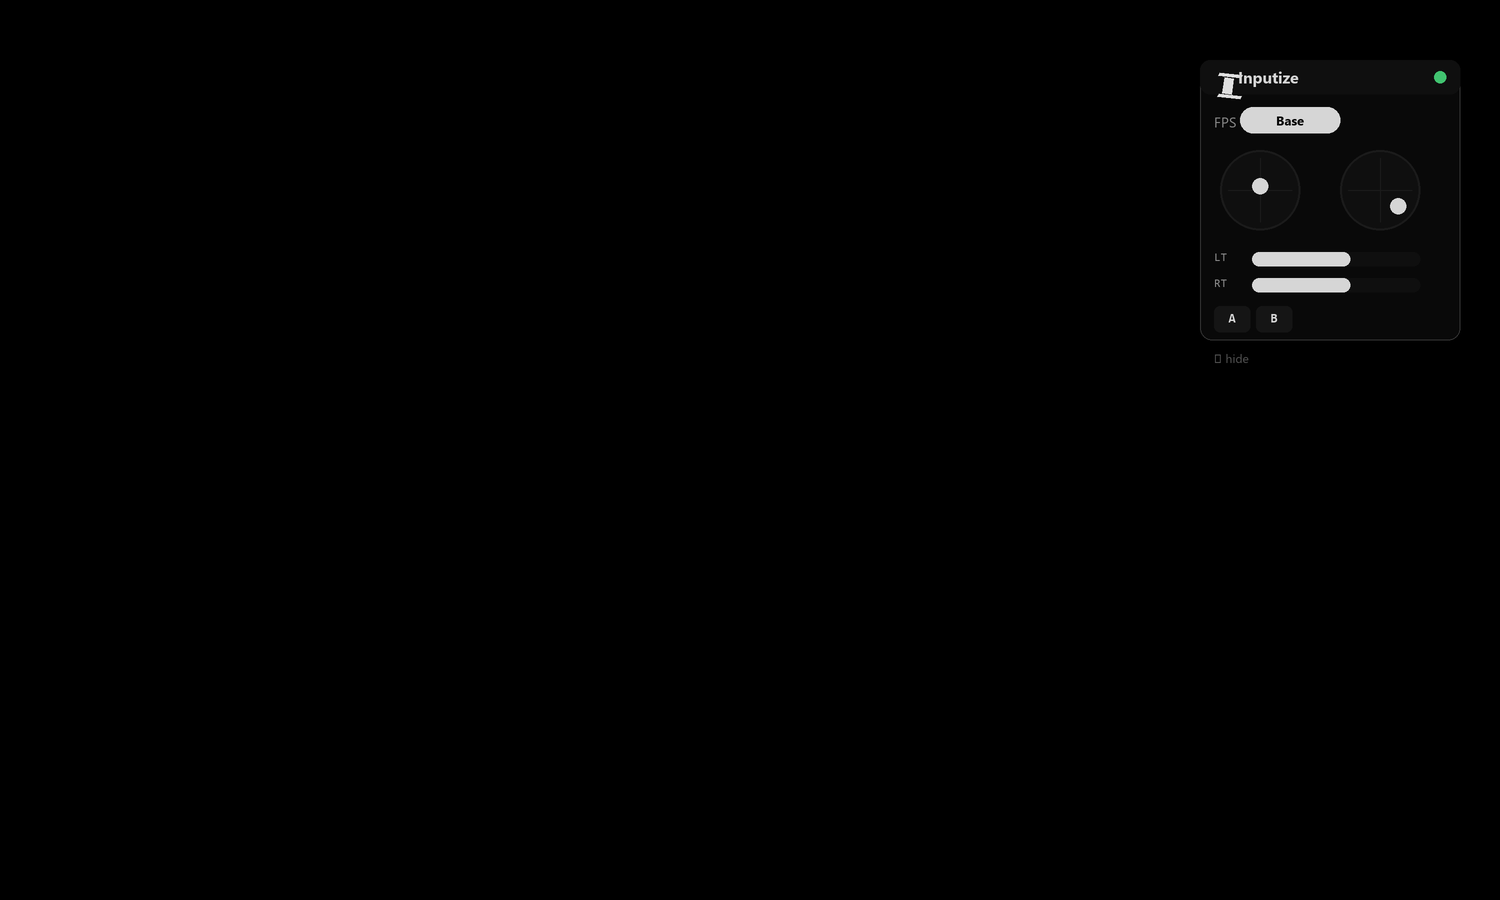
A transparent window above the game shows: emulation status (green dot), active profile, layer, the current position of both sticks, LT/RT trigger levels and held buttons. The window is always on top, draggable with the mouse; the ✕ hide button hides it until re-enabled.
- Show/hide: the Overlay button in the header or the
Show overlaysetting. - Position: top-right / top-left / bottom-right / bottom-left / center-top.
- Opacity: 20–100 % (Settings → Overlay).
10.2. System tray
Closing the window (✕) minimizes the program to the tray instead of quitting (the Minimize to tray setting). A click on the icon opens the window; right-click opens a menu: Show / Hide, a live Emulation: ON/OFF toggle (works right in the middle of a game) and Quit.
// 11 · APPLICATION SETTINGS
11. Application Settings
The Settings button in the header opens the global application settings (not per-profile). Sections:
11.1. Behavior
- Start minimized — launch with the window hidden.
- Minimize to tray — minimize to the tray when the window is closed.
- Auto-start with Windows — launch together with the system.
- Desktop shortcut — create a shortcut on the desktop (portable build).
11.2. Mouse Safety
Some games (e.g. Apex) freeze the mouse while they see a held gamepad button. The Mouse-safe button setting picks a virtual gamepad button that the engine will not send to the game — the mouse keeps working. If a game “freezes” your look, select here a button you don't use (e.g. Guide).
11.3. In-Game Overlay
- Show overlay — show the overlay at startup.
- Position — screen corner: top-right, top-left, bottom-right, bottom-left, center-top.
- Opacity — 0.2–1.0.
11.4. Hotkeys
Reassign the four global keys: Toggle emulation (F11), Next profile (F9), Previous profile (F10), Reset stick (F12). Click a field and press the new key. If two functions get the same key, the field turns red and a conflict warning appears.
11.5. Drivers
Live status of the ViGEmBus driver: “✓ Installed and working”, “⚠ Installed — reboot required” or “✕ Not installed”. The Open ViGEmBus page → button opens the driver releases page.
11.6. Performance & Misc
- Max log lines — the log length (100–2000 lines).
- Check for updates — background update checks at startup; the Check now button checks manually.
// 12 · FAQ
12. FAQ
The game doesn't see the gamepad
- Make sure the ViGEmBus driver is installed (Settings → Drivers → status).
- Reboot the computer after installing the driver.
- Press F11 or the “Activate” button — the indicator should turn Active.
- In the game's settings choose gamepad (Xbox 360) controls if the game allows it.
- Check the Log tab — it shows whether emulation is running and any errors.
The mouse isn't converted to a stick
- Emulation must be active (green indicator / F11).
- Check that RS-X and RS-Y are mapped to
mouse_xandmouse_y. - Check the sensitivity on the Mouse→Stick tab — if it is zero, the stick won't move.
Will an anti-cheat block me?
ViGEmBus is an open virtual-gamepad driver used by thousands of programs (DS4Windows and others). Emulation happens at driver level, the game sees an ordinary controller, and the program does not inject into the game process. That said, online-game rules may ban any third-party tools — the decision to use it and the associated risk are yours.
F9/F10/F12 don't work in-game
That's expected: while emulation is active only the toggles work (F11 and the tray). Turn emulation off and the other hotkeys work again.
A hotkey doesn't fire at all
Another program may already own the combination. Assign a different key in Settings → Hotkeys — the program shows conflicts right away.
The activation window reappeared after I already activated
The license file lives in %APPDATA%\Inputize\license_emulator.json. Deleting it re-enables the activation window — enter your key again. Once activated and working offline, the window should not appear.
Where are profiles and settings stored?
In the portable build — %APPDATA%\Inputize\: profile files (profiles/*.json), settings (profiles/_settings.json), the license (license_emulator.json) and logs (logs/).
// 13 · TROUBLESHOOTING
13. Troubleshooting
| Symptom | Cause | Solution |
|---|---|---|
| SmartScreen on launch | File is unsigned | More info → Run anyway; the ViGEmBus driver is Microsoft-signed |
| “Installed — reboot required” | Driver installed, reboot needed | Restart the computer |
| ViGEmBus install fails (code 1603 etc.) | System restrictions | Download the installer from github.com/ViGEm/ViGEmBus/releases and install manually |
| The overlay doesn't appear | Disabled in settings | Settings → In-Game Overlay → Show overlay; the Overlay button in the header |
| Emulation is on but the stick doesn't move | Mouse axes not bound | Check RS-X/RS-Y → mouse_x/mouse_y and the sensitivity |
| A game “freezes” the mouse | It sees a held gamepad button | Settings → Mouse Safety → pick an unused button |
| Actual Hz below the declared value | Weak hardware / background load | Lower the Poll Rate to 250–500 Hz |
| The program won't start | Broken deps/cache | Delete %APPDATA%\Inputize and run again; check inputize-emulator_crash.log |
// 14 · FAIR PLAY & SAFETY
14. Fair Play & Safety
- Inputize works at the ViGEmBus driver level — the game sees an ordinary Xbox 360 gamepad; the program never touches game memory or runs scripts inside it.
- The program reads only the keyboard, the mouse and its own virtual gamepad state; the only network traffic is license/update checks.
- The license key is bound to your account and stored locally; your account password is never saved anywhere.
- Using the emulator in online games is your responsibility: review the rules of the specific game. Game developers may consider any third-party tool a violation.
// APPENDIX A
Appendix A. Profile parameter reference
A profile is a JSON file in the profiles/ folder. Main fields:
| Field | Type | Default | Purpose |
|---|---|---|---|
name | string | FPS | Profile name |
icon | string | 🔫 | Emoji icon |
process_names | array | [] | Game processes for auto-detection (e.g. cod.exe) |
mappings | object | — | Button bindings (see 6.2) |
mouse_sensitivity | object | hip 65 / ads 40 | Hip and ADS sensitivity |
mouse_sensitivity.x_mult/y_mult | number | 1.0 / 0.9 | Axis multipliers |
active_curve | string | Linear | Active response curve |
curve_intensities | object | 100 | Intensity of each curve |
smooth_preset | string | Balanced | Smoothing preset or Custom |
smooth_mode | string | standard | standard / classic |
mouse_boost | bool | true | Boost on flicks |
mouse_deadzone | number | 5 | Mouse speed deadzone, px/s |
return_delay_ms | number | 50 | Stick return delay |
return_time_ms | number | 60 | Stick return speed |
recoil_comp | bool | false | Anti-recoil |
recoil_x / recoil_y | number | 0 / 15 | Stick offset while firing, % |
recoil_ramp_ms / release_ms / delay_ms | number | 120 / 120 / 0 | Anti-recoil smoothness parameters |
quant_mag / quant_angle / quant_mag_speed | number | 0 | Aim-assist quantization |
init_deflection | number | 0 | Initial stick deflection |
cap_drop | number | 0 | Turn Speed Cap |
orbital_ads_aa / orbital_ads_strength | bool / number | false / 10 | Orbital AA in ADS |
deadzone_rs / max_zone_ls / max_zone_rs | number | 0.08 / 1.0 / 1.0 | Stick deadzones and caps |
trigger_mode_lt / trigger_mode_rt | string | analog | Trigger mode |
lt_threshold / rt_threshold | number | 25 | Trigger thresholds, % |
poll_rate_hz | number | 500 | Stick report rate (125–1000) |
// APPENDIX B
Appendix B. Files & folders
%APPDATA%\Inputize\
├── license_emulator.json     — license cache (delete to activate again)
├── profiles\                 — profiles (*.json)
│   └── _settings.json        — global application settings
└── logs\                     — inputize-emulator.log (rotated 5 × 1 MB)

next to the exe: inputize-emulator_crash.log — crash log// APPENDIX C
Appendix C. Hotkey summary
| Key | Action | Available |
|---|---|---|
| F11 | Enable / disable emulation | Always, including in-game |
| F9 | Next profile | Emulation off |
| F10 | Previous profile | Emulation off |
| F12 | Reset right stick | Emulation off |
| LMB | RT (fire) | In-game, while emulation is active |
| RMB | LT (aim) | In-game, while emulation is active |